![]()
![]()
![]()
![]()
![]()
| The Drawing tool is used to create 2D or 3D curves. |
|
This tool opens a line drawing tool palette:
· Circle
· Rectangle
· Arc
· Polyline
· Curve
· Interpolated curve
· Sketch
· Helicoid
· Symmetry
q General use of the Drawing tool palette
1. Selecting the Drawing tool palette.
Click on the icon depicting the Drawing tool in the Tools Palette.
2. Displaying and positioning the drawing palette.
When you enter the tool, Amapi 3D displays the following palette. This palette contains all of the Drawing tools:
![]()
1 2 3 4 5 6 7 8 9
1. Circle
2. Rectangle
3. Arc
4. Polyline
5. Curve
6. Interpolated curve
7. Sketch
8. Helicoid
9. Symmetry
![]()
You may, if you like, display this palette vertically. To
do so, click on the toggle-icon “Reverse”.
![]()
You can also decide to keep this palette displayed all the
time. To do so, click on the toggle-icon “Lock”.
![]()
If you use the drawing palette out of the Drawing tool (you
had “locked” the palette), you will not be able to:
· Connect the curves
between them (step 7)
· Use the Symmetry
tool (if you need to do a mirror image of a drawing out of the Drawing tool, use the
“Symmetry” tool included in the Assembly palette.
3. Positioning the axis origin.
· When entering the tool:
Amapi 3D automatically positions the origin of the axis at the Target Point (see chapter User Manual/Modeling help tools/ Control Panel/ Point of View/ Target Point).
· When using the tool:
The origin is positioned where it was left the last time you used a drawing tool.
The current cursor is the Bullseye. It shows you that you can choose a new axis origin. If you want to, you can click on one of the existing points of the scene, which will become the reference point for all the operations you do with this tool. If you click on an empty area of the scene, Amapi 3D will select the closest point of the closest element.
4. Specifying the mode: NURBS or polygonal.
|
Some types of curves can be
created either in NURBS mode or in polygonal mode (circle, rectangle, arc, curves).
The Assistant Palette includes a “Modes” area displaying two buttons used to switch from one drawing mode to another. Make sure that the correct mode button is selected. Otherwise, click on it or use the hotkeys: PC: Ctrl+B, Mac: Command+B. |
Other types of curves can only be created in polygonal mode (polylines, sketch, helicoid). Amapi 3D will always draw them in polygonal mode no matter what mode is selected.
5. Selecting a drawing tool.
Once the axes are set, select a Drawing tool from the sub-palette. The curve you will create will lie on the plane defined by the two axes and the origin.
6. Drawing a curve and validating it.
See the paragraph below corresponding to the drawing
tool selected:
· Circle
· Rectangle
· Arc
· Polyline
· Curve
· Interpolated curve
· Sketch
· Helicoid
· Symmetry
Unless you specify otherwise, the cursor can move freely in
any direction. Amapi 3D allows you to apply a constraint to the cursor movement and
positioning. (See User Manual/ Modeling help tools/ Control panel/ Cursor moving and
positioning constraints.)
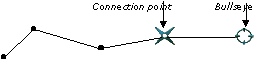
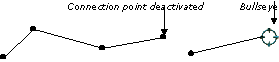
7. The curve is drawn. There are two possibilities:
· You do not want
to create other curves: Go to next step.
· You want to
continue to draw curves:
· If the created
curve is a closed curve, go back to step 3.
· If the created
curve is an open curve, the last point of the curve is the connection point. If you
now draw another curve, it will be connected to the connection point. It will form a
single curve.
Connected curves:
 |
|
| Last created curve | Next curve being drawn |
If you want to create a new curve not connected to the previous one, you need to deactivate the connection point. Press the spacebar to deactivate it.
Curves not connected:
Last created curve |
Next curve being drawn |
Go back to step 4 to draw the next curve.
8. Ending the action.
Put the tool aside to end the tool action (depending on the interface). See chapter User Manual/tools/Generic use of a tool/How do you end a tool action?
![]()
Use the Circle tool to create a circle. A circle can be
created either in polygonal mode or in NURBS mode. A NURBS circle looks similar to a
polygonal circle, but is composed of two half-circles. When editing a NURBS circle, you
will pull the control points of the NURBS envelope instead of pulling the points of the
circle directly. Only one half-circle will be modified. You will need to specify the
drawing mode before creating the circle.
Use of the Circle sub-tool:
1. Setting the center of the circle.
· Click to specify
the center of the circle.
or
· Press the Tab key
to enter precise coordinates for the location of the center of the circle. Press the
Return key to validate the entry.
2. Setting the radius of the circle.
· Drag the mouse
and click at the desired radius.
Or
· Press the Tab key
and enter a precise radius value. Press the Return key to validate.
3. Specifying the number of points of the circle.
Once the circle is created, the “+/-” Tuner
appears. It allows you to specify the number of points used to define the circle.
To adjust:
· Press the
“+” and “-” keys of the numeric keypad.
· Click on the
“+” and “-” buttons of the Assistant Palette.
· Press the Tab key
and enter the desired number of points.
4. Ending the action of the sub-tool.
Put the tool aside or validate to end the action (depending on the interface). See chapter User Manual/Tools/Generic use of a tool/How do you end a tool action?
| Practical exercises: · A cone on a sloping plane/The cone/Step 1 · A glass/Drawing the construction curves/Step 1 · A tiled floor/Create geometric shapes/Step 2 · A chair/The foot/Step 1 · Intersecting pipes/Draw the base (circle) · An acoustic baffle/Punch the loudspeaker’s hole/Step 2 |
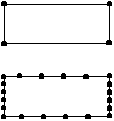
| A polygonal rectangle is
defined by its four corner points. A NURBS rectangle displays additional points on each segment They are used to transform the straight lines into a curve. |
|
| Note: The NURBS rectangle is not a closed curve. Amapi 3D does not handle periodic NURBS and true closed curves cannot be created in NURBS mode. |
Use of the Rectangle sub-tool:
1. Specifying the first corner of the rectangle.
· Click to specify
the first corner.
· Or press the Tab
key to enter precise numerical coordinates for the first corner. Press the Return key to
validate the entry.
2. Specifying the opposite corner.
· Drag the cursor
to the location of the opposite corner and click.
· Or press the Tab
key to enter the precise numerical coordinates of the opposite corner. Press the Return
key to validate the entry.
| Practical exercises: · A house/The walls/Step 2 · A house/The peaks/Step 1 · A house/The main beam/Step 1 · A house/The rafters/Step 2 · A tiled floor/Create geometric shapes/Step 1 · A chair/The seat/Step 1 |
![]()
An arc can be created in polygonal or NURBS mode: a NURBS
arc looks like a polygonal one, but consists of two NURBS arcs joined together. When
editing a NURBS arc, you will be pulling the control points of the NURBS envelope instead
of pulling directly on a point of the arc. Only one of the two half-arcs will be modified.
You must specify the drawing mode before creating the arc.
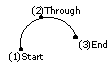
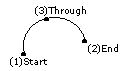
There are two ways to define an arc:
 |
 |
A center , a start point, and an endpoint of the arc |
A start point of the arc, a through point, and an endpoint of the arc |
Usage:
1. Select one of the five available methods.
· Put the cursor on the “Arc” icon while holding down the left mouse button. A sub-palette appears and offers you five methods for drawing an arc.
Icon |
Setting points order |
|
|
1. Center 2. Start 3. End |
|
|
1. Start 2. Center 3. End |
|
|
1. Start 2. Through 3. End |
|
|
1. Start 2. End 3. Through |
|
|
1. Start 2. End 3. Center |
|
· Put the cursor over the icon depicting the method you want, then release the mouse button.
2. Specifying the points that define the arc.
You have several options:
· Interactively: Move
the cursor to where you want it in the scene and click (use the constraints if needed:
User Manual/ Modeling help Tools/Assistant Palette/Cursor movements and positioning
constraints).
· Entering numerical
values through the keyboard: Press the Tab key to select the dialog box fields, enter a
value and validate. You can also the Remote Control or the Tuner (User Manual Tools/ The
data window/Numerical Data/Modifying a numerical value).
![]()
If necessary, you can use a different mode for each point.
3. Specifying the number of points of the curve.
Once the arc is created, the “+/-” Tuner
appears. It allows you to specify the number of points used to define the arc.
To modify the number of points, you can:
· Press the
“+” and “-” keys of the numeric keypad.
· Click on the
“+” and “-” buttons of the Assistant Palette.
· Press the Tab key
and enter the desired number of points, then validate.
4. Ending the tool action.
· End the action
by validating or putting the tool aside. See chapter User Manual/Tools/Generic use of a
tool/How do you end a tool action?
Or
· Select another tool
in the 2D palette, and continue to draw other shapes.
| Practical exercises: · A house/The tiles/Step 1 |
![]()
Use the Polyline tool to draw a set of connected straight
line segments. A polyline cannot be created in NURBS mode.
Use of the Polyline sub-tool:
1. Specifying the first point of the curve.
· Click on a
point.
· Or press the Tab
key to enter a precise numerical value. Press the Return key to validate the entry.
2. Drawing the curve.
· Click the mouse
button for each additional point that you want to specify for the polyline.
· Or press the Tab
key to enter the precise coordinates of the points defining the polyline.
Each new point is connected to the previous point by a line
segment.
3. Validating the drawing of the polyline.
Press the Return key to validate the entry.
![]() Defining
a constraint on an axis
Defining
a constraint on an axis
Click on the appropriate constraint icon in the Assistant
Palette to draw a straight vertical or horizontal line (or press the spacebar to toggle
the axis). If only one axis is available you will have to draw along this axis.
![]() Using
polar coordinates
Using
polar coordinates
You can work in either Cartesian coordinates (X, Y, Z) or
polar coordinates (distance relative to the previous point and angle relative to the
previous edge).
To switch from one mode to another:
· On PC: Click the
right mouse button.
Or
· On Mac: Press the
Option key and simultaneously click the mouse button.
![]() Creating
a closed polyline
Creating
a closed polyline
Click on the first point of a polyline to snap the last
point to it and close the polyline.
![]() Creating
a 3D polyline
Creating
a 3D polyline
Use the arrow keys of the numeric keypad to change the view
and working plane as you are drawing the line. This will enable you to create points on
the other perpendicular planes and create a polyline in 3D.
| Practical exercises: · Pipes/Draw the path · A house/The rafters/Step 1 · A glass/Drawing the construction curves/Step 2 · An acoustic baffle/Draw the box/Step 2 · A little ant/Constructing half of the head/Step 1 |
![]()
The Curves tool generates a curve that is controlled by
the points entered. Amapi 3D will use these points as polygons of control. This tool can
generate either NURBS curves or polygonal curves.
Usage of the Curve sub-tool:
1. Designating the starting point of the curve.
· Click on a
point.
· Or press the Tab
key to enter precise numerical coordinates for the first point. Press the Return key to
validate the entry.
2. Drawing the curve.
· Click the mouse
to create as many points as needed to define the curve.
· Or press the Tab
key to enter the precise numerical coordinates of the points. Press the Return key to
validate the entry.
3. Validating the drawing.
Press the Return key to validate the drawing.
4. Ending the sub-tool action.
Validate or put the tool aside to end the sub-tool
action (depending on the interface). See chapter User Manual/Tools/Generic use of a
tool/How do you end a tool action?
Or
Select another Drawing tool to create another 2D curve.
![]()
To add a point to an existing curve, press the Shift key
and simultaneously click the mouse button.
![]()
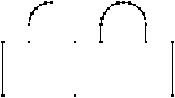
Closed curve
Snapping the last point to the first one will close the
curve.
![]()
As Amapi 3D does not handle periodic NURBS, it is
technically impossible to generate a closed NURBS curve.
![]()
Creating a NURBS curve in 3D
Use the arrow keys of the numeric keypad to change the view
and working plane while you are drawing the curve. This will allow you to create points on
the nearest perpendicular plane and create a NURBS curve in 3D.
![]()
NURBS curves are always created as NURBS even if the
NURBS mode of the Tools menu is not selected.
| Practical exercises: · A windshield for a motorbike/(1st method: Coons)/Step 1 · A windshield for a motorbike/(2nd method: ruled surface)/ Step 1 · Hull for a boat (example 1)/(1st method: hull)/Step 1 |
| Practical exercises: · Hello! (3D text)/Modeling the text/Step 1 · Potato chips/Step 1 |
![]()
This tool allows the user to draw a curve
“freehand” as if using a pencil. The curve generated by Amapi 3D will follow the
path drawn by the cursor movements. The curve will always be generated in polygonal mode.
Usage of the Sketch sub-tool:
1. Specifying the step size.
The step size is the distance between the points
defining the curve. To change this value:
· Press the Tab key.
· Enter a new step
size value.
· Press the Return
key to validate the entry.
2. Drawing the curve.
· Position the
cursor at the exact location where you want to start the drawing.
· Press the mouse
button and do not release it.
· Move the mouse: a
curve is generated following the path of the cursor.
· Release the mouse
button to end the drawing.
![]()
This tool is used to create helicoids and spirals.

Use of the Helicoid sub-tool:
1. Setting the center of the base of the helicoid.
A circle representing the base of the helicoid follows
the movements of the cursor.
· Click to set the
base of the center.
or
· Press the Tab key
to enter the coordinates of this point. Press the Return key to validate the entry.
2. Setting the radius.
· Drag the cursor
sideways to set the radius.
· Click to validate.
or
· Press the Tab key
to enter the radius value. Press the Return key to validate the entry.
3. Specifying the number of spirals.
By default, Amapi 3D creates a helicoid with one spiral.
To set the number of spirals:
· Press the Tab key
and enter a spiral value. Press the Return key to validate or press Tab again and enter
the height of the helicoid.
4. Specifying the height of the helicoid.
· Drag the cursor
vertically to set the height.
· Click to validate.
or
· Press the Tab key
and enter the height. Press the Return key to validate.
![]() A helicoid with a height of 0 is a spiral.
A helicoid with a height of 0 is a spiral.
5. Validating.
Press the Return key to validate.
6. Specifying the number of points.
The “+/-” Tuner icon displayed indicates that you can set number of points describing the helicoid using the “+” and “-” keys of the numeric keypad.
7. Ending the action.
Validate or put the tool aside to end the sub-tool
action (depending on the interface). See chapter User Manual/Tools/Generic use of a
tool/How do you end a tool action?
Or
Select another Drawing tool to create another 2D curve.
![]()
Use the Symmetry tool to create the mirror image of a
curve.
Use the polyline, arc, Bezier curve, or NURBS curve
drawing tool to create an open curve. Make sure that the connection point marked by the ![]() icon is visible (see the beginning of the
chapter: Drawing).
icon is visible (see the beginning of the
chapter: Drawing).
The mirror image of a NURBS curve is another NURBS curve.
Use of the Symmetry sub-tool:
Do not use the arrow keys to change the point of view
while using the 2D Symmetry tool. Make sure that you are working in the right plane before
selecting the 2D Symmetry tool.
![]()
If you intend, while drawing a curve, to make a mirror
image of the curve you are drawing, do not leave the Drawing tool. You can not make a
mirror image of a curve once you leave the tool used to draw it.
1. Changing the axis of symmetry (horizontal or vertical).
A straight line is displayed as you move the cursor. It
represents the axis of symmetry.
To change its orientation, you can either:
· Click on the icon
depicting the correct orientation in the Assistant Palette.
· Press the spacebar
to select different orientations, cyclically.
2. Positioning the axis of symmetry.
Drag the cursor and click the mouse button when the
straight line is at the location where you want to create a mirror image.
You may also press the Tab key and enter the precise
numerical coordinates of the axis of symmetry.
A symmetric reflection of the curve is displayed. It is
connected to the original curve, both curves being one single drawing.
![]()
![]()
![]()
![]()
![]()